


Creating JavaScript solutions in Cognos reports to enhance the out-of-box capabilities of the tool may seem like a daunting task to many Cognos report developers. As a seasoned Cognos developer I can understand this trepidation and it is true that unlike using the Report Studio tool to build professional reports, writing JavaScript code is not for everyone. Despite the difficulty of using APIs and developing JavaScript applications in Report Studio, there is business value in using JavaScript to reverse engineer aspects of the Cognos Viewer in certain circumstances. For instance, embedding a Google map in a report or providing the ability to show and hide particular objects in a report. So the obvious question becomes: How do I write JavaScript code with little or no programming experience? Read on to find out!
Note:
- The following examples are specifically for IBM Cognos 10 Report Studio based reports. It is assumed that the reader is familiar with Cognos Report Studio.
- For more information about JavaScript and HTML language basics, visit http://www.w3schools.com and other tutorial materials available on the web or hardcover book.
- Code development environment: IBM Cognos 10.1 FP1, single server, IE 8
1 – JavaScript Basics
What is JavaScript?
JavaScript is the scripting language of the Web. It is used in millions of web pages to add functionality, validate forms, communicate with servers, and much more. It is designed to add interactivity to web pages (often time executed on the end user’s machine). It is usually embedded directly into web pages and requires no licensing fees or support contracts.
What can JavaScript do?
- Dynamically add/edit text on a web page.
- React to events – JavaScript can be set to execute when something happens, like when a page has finished loading or when a user clicks on a button.
- Read and write HTML elements – JavaScript can read and change the content of an HTML element.
- Be used to validate data – JavaScript can be used to validate form data before it is submitted to a server. This saves the server from extra processing.
- Detect the end user’s browser – JavaScript can be used to detect the visitor’s browser, and depending on the browser load another page specifically designed for that browser.
- Be used to create cookies which can be used to identify users.
Where to put JavaScript?
The HTML <script></script> tag is used to insert JavaScript code into an HTML page. For a formal style, use the following:
<SCRIPT LANGUAGE=”JavaScript”>
<!–
Javascript_body;
//–>
</SCRIPT>
These tags will help to ensure no errors occur if the browser the user is using doesn’t support JavaScript.
2 – Web Page Basics
Ok, JavaScript works on web pages, but what is a web page? Very simply : a Web Page equals a HTML Document. Fundamentally, a web page is a text file described in Hyper Text MarkupLanguage (HTML) which a web browser like Internet Explorer or Firefox is able to understand, interpret and display as web pages. The browser does not display the HTML tags, but uses the tags to translate the content of the page. HTML itself is not a programming language, rather a markup language. A pure HTML web page is a static text file. When ASP.net, JSP, PHP or other technologies is engaged, a dynamic web page is generated based on interactions and communication between web pages, users and servers.
Regardless whether a web page is dynamically generated or is static, normally it contains:
- HTML tags.
- Elements or Objects, such as text, image, buttons, links etc.
- Each element has its attributes to describe how it should be displayed, such as color, size, title, ID.
- A layout so that it looks neat and readable.
- Style and formatting. Beginning with HTML 4.0, all formatting can be removed from the HTML document, and stored in a style sheet. You can still define local style on individual web pages if desired.
- Forms: to take inputs (requests) from users.
- Frames: to display multiple web pages in the same browser window.
- iFrames: to display a web page within a web page.
3 – IBM Cognos Report Page Structures
IBM Cognos 10′s family of products are built as a web based application, and you have learned that JavaScript is a scripting language that works on a web page. Because of this, JavaScript can be applied to reports developed in IBM Cognos Report Studio. Theoretically, when an IBM Cognos report runs in HTML format, both prompt page and report page are web pages just like any other ordinary web page you visit every day. Behind the scenes, the prompt page and report page are dynamically generated web pages. Live data is dynamically retrieved from the backend database and this information is communicated to the prompt pages (if any) and report pages. Before we get started writing JavaScript into report, let’s first take a look at the page structure of the prompt and report pages:
Prompt Page Structure
Typically a report prompt page will have one or more prompts and action buttons such as Cancel, Back or Finish. For demonstration purposes, let’s build a simple report with one prompt.
Steps:
- Open Cognos Report Studio
- Select Go Sales(query) package
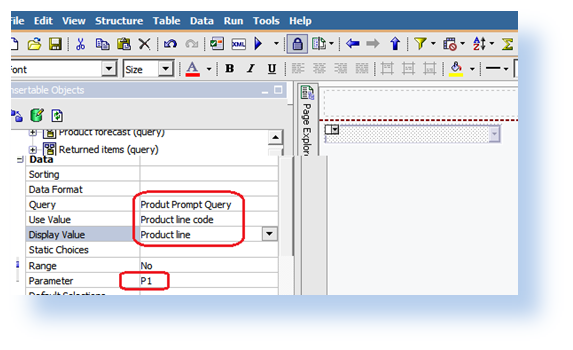
- Create a query named “Product Prompt Query”, drag the Product line and Product line code data items from the Products query subject under the Sales (query) namespace.
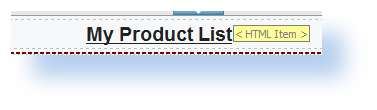
- Create a simple value prompt named “P1″ which will use the Product Prompt Query. Set the “use value” to Product line code, and the “display value” to Product line.
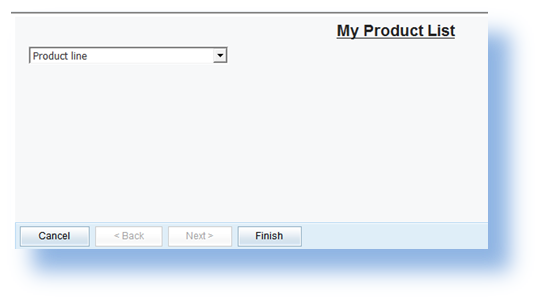
- Type in “My Product List” in title area. The prompt page should resemble the following image:
- Save the Report
- Run the report in HTML format. You will notice the following HTML elements on prompt page:
- Report Title – “My Product List”. It’s a text element of a web page.
- Drop down list – “Product line”.
- Action Buttons – “Cancel”, “Back” (disabled), “Next”(disabled), Finish. Back and Next buttons are disabled because only one prompt page is present.
Notice that each element is nicely styled and formatted. The buttons have background images, the report title is big and bold and even the drop down box is formatted.
Report Page Structure
- Continuing on above report, go to Report Pages -> Page 1.
- Expand the Sales (query) namespace, drag Product line from Products, and Quantity and Revenue data items from the Sales query subject into the list.
- Add an optional detail filter:[Sales (query)].[Products].[Product line code] in ?P1?
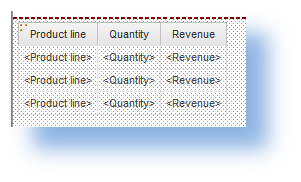
- Your report page should look like this:
- Type in “My Product List” in title area. Save the report as “mylist”.
- Run the report. When prompted don’t select any product line, you will see all product lines shown on the report:
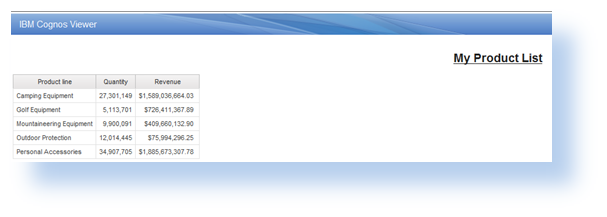 On this report page we have:
- An IBM Cognos page header with a blue image as background.
- A report title – “My Product List” as a text element.
- A list table which holds all data retrieved. The table has header rows and is formatted by a default style sheet.
- At the bottom of page, there is also a footer which has the date, time, and page numbers. All displayed as text elements.
4 – Adding JavaScript into an IBM Cognos Report
At this point we have discussed JavaScript and web page basics. It’s time to add in our very first JavaScript code into report. Similar to work on any other web pages, there are two ways you can insert JavaScript into a Cognos report. You can reference pre-written JavaScript using the syntax<Script src=”myscript.js”></Script> or simply embed the code directly on the page with the <script> tag.
Embedding JavaScript Directly
In the following example we will call a very simple JavaScript function: alert(). When the script being executed, it will pop up a small window on user’s screen, and display the text message specified. This method is often used as a warning to users; developers often used it for debugging code.
Steps:
- With the sample “mylist” report opened in Report Studio, go to the prompt page.
- From the Insertable Objects tab, drag a HTML Item from the toolbox and place it after the report title. Double click on the HTML Item and type in the following:<script > alert(“Hello World”);</script>
- Click on Ok, then save the report.
- Run the report and you will see a small popup window which displays the message “Hello World”.

- You have just completed your very first JavaScript modification.
Reference a JavaScript file
Alternatively you can save commonly used or complex JavaScript as a text file and share the file among reports (web pages). You must save the file with a .js extension.
Steps:
- Open a text editor, such as Notepad.
- Type in the following:alert(“Hello World”);
- Save it as “test.js” under the “Cognos root/webcontent” folder on your application server.
- Open the “mylist” report in Report Studio and proceed to Page 1.
- Drag a HTML Item from the Insertable Objects tab, and place it after report title. Double click on the HTML Item and type in the following:<script type=”text/javascript” src=”../test.js”></script>
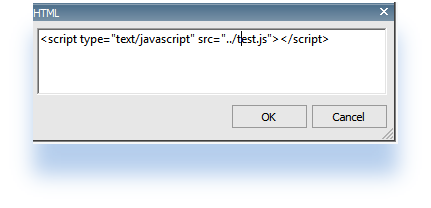
- Save the report.
- Run the report. You will notice that the same pop up window is shown twice. One on prompt page and the other from the report page. The JavaScript works on both prompt pages and report pages!
So far we have provided a very basic introduction to JavaScript in IBM Cognos reports. In the next article we will look at how to reach an element/object on a report page or prompt page and how to edit attributes of an element. Stay tuned.
In the previous JavaScripts, we spent some time learning about JavaScript and web page basics. We completed a couple of simple examples on how to insert JavaScript into an IBM Cognos report in Report Studio. Today let’s continue our journey.
Note:
All information and examples are specifically designed for IBM Cognos 10 Report Studio based reports. It is assumed that the reader is familiar with Cognos Report Studio.
- For more information about JavaScript and the HTML language basics please go tohttp://www.w3schools.com and other available web based tutorials.
- Code development environment: IBM Cognos 10.1 FP1 , single server, IE 8
5 – Reaching a Prompt Element
Obviously, in order to use JavaScript to modify or manipulate an element on a web page, you first need to reach or find the element you want to edit. As I mentioned in section 3 in the previous article, Cognos prompt pages and report pages are dynamically generated web pages. Prompts placed in Cognos reports are designed to take user inputs and submit requests to a web server. Like many other web pages a <Form> element is embedded on the page in order to accept user’s input. As you can imagine, all prompts elements are tied to this intake form. This allows us to easily access any prompt element once we find the form.
Here is the typical call you can use in JavaScript to find the “invisible” form in a Cognos report:
var fW = getFormWarpRequest();
Depending on the type of the prompt you are dealing with, you can get the prompt object using the following name convention:
| Text Edit Box | fw._textEditBox<prompt name> |
| List Box | fw._oLstChoices<prompt name> |
| Drop Down List | fw._oLstChoices<prompt name> |
| Radio Button Group | fw._oLstChoices<prompt name> |
| Check Box Group | fw._oLstChoices<prompt name> |
| Date Edit Box | fw.txtDate<prompt name> |
Let’s apply this logic to the sample report developed in the Part 1 of the previous article.
Steps:
- Open the previously saved sample report “mylist” in Report Studio. If you haven’t created it yet or lost it check IBM Cognos and JavaScript– Part I, Section 3 to create it.
- Go to Prompt Pages -> Prompt Page 1.
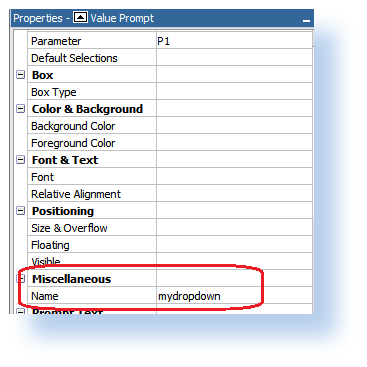
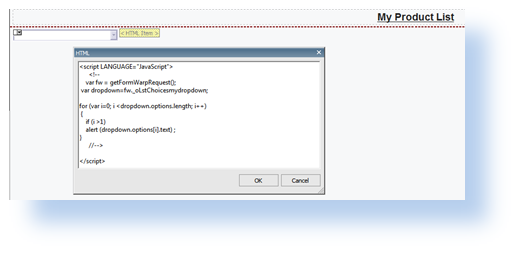
- Click on drop down prompt P1. On the properties panel under Miscellaneous->Name, give this prompt object a name such as “mydropdown”.
- Double click on the HTML item, added in the previous steps to create the report, next to report title. Change the JavaScript code to:<script LANGUAGE=”JavaScript”><!–// call Cognos built-in function to get the form elementvar fw = getFormWarpRequest();//get the drop down elementvar dropdown=fw._oLstChoicesmydropdown;//next will loop through all the options of the drodown lisfor (var i=0; i <dropdown.options.length; i++){if (i >1) //skip the first two default options Cognos generatedalert (dropdown.options[i].text) ; //call alert function to display the text value of the option}//–></script>
- Move the HTML Item next to drop down prompt. Your report should look like below:
- Save the report.
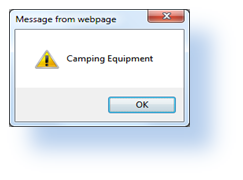
- Run it from Report Studio. You will see popup windows shown 5 times. Each one displays the text value of each option of the dropdown box.

6 – Reaching a Report Data Element
An IBM Cognos report page is really just a web page that dynamically displays report content based on data query results. The most frequently used data containers are lists and crosstabs. How do I access a list/crosstab then? Is that even possible? Fortunately the answer is yes. In section 3 of thelast article, we examined the report page structure. A list or crosstab on report page is just a table element, styled and formatted according to Cognos global style sheets.
Steps:
- Open the previous saved sample report “mylist” in Report Studio.
- Go to Report Pages -> Report Page 1
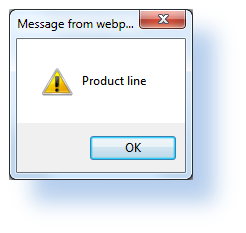
- Double click on the HTML Item, replace the JavaScript code with the following:<script language=”JavaScript” type=”text/javascript”>//<!–var tbls = document.getElementsByTagName(“TABLE”) // first get all the table objects on the pagevar tblCnt = tbls.length; // determine the number of tablesfor(var t=0; t<tblCnt; t++) //loop through each table object{var tbl = tbls.item(t); // define the current tableif (tbl.className == “ls”) //this is our list table{var cell= tbl.rows(0).cells(0); // reach the first cell of the first row of the list tablealert( cell.firstChild.innerHTML); //display the first cell content/text}}//–></script>
- Move the HTML Item after the list. Your report should look like below:

- Save the report.
- Run it from Report Studio. You will see a popup window that displays the first column header text “Product line”:
In the next couple steps, we are going to really start to enhance the abilities of the tool and modify an element’s attributes on a click event.
A HTML element may have many attributes:
- Attributes provide additional information about an element.
- Attributes are always specified in the start tag.
- Attributes come in name/value pairs like: name=”myname”, value=”code1″
- Attribute values should always be enclosed in quotes. Double style quotes are the most common, but single style quotes are also allowed.
Below is a list of some attributes that are standard for most HTML elements:
| Attribute | Value | Description |
| class | classname | Specifies a classname for an element |
| id | id | Specifies a unique id for an element |
| style | style_definition | Specifies an inline style for an element |
| title | tooltip_text | Specifies extra information about an element (displayed as a tool tip) |
Event attributes vary for each element, here are some common ones:
| Attribute | Value | Description |
| onblur | Script | Script to be run when an element loses focus |
| onchange | script | Script to be run when an element change |
| onclick | script | Script to be run on a mouse click |
| ondblclick | script | Script to be run on a mouse double-click |
| onfocus | script | Script to be run when an element gets focus |
| onmousedown | script | Script to be run when mouse button is pressed |
| onmousemove | script | Script to be run when mouse pointer moves |
| onmouseout | script | Script to be run when mouse pointer moves out of an element |
| onmouseover | script | Script to be run when mouse pointer moves over an element |
| onmouseup | script | Script to be run when mouse button is released |
7 – Edit a Prompt Element
In section 5, we learned how to reach a prompt element using JavaScript. Once you get an object you want to control, it simply becomes a task of modifying the attributes that you wish to alter.
Let’s take a look at how JavaScript can remove the default style of the dropdown list prompt and add in a custom background color. When the user makes a selection from drop down list JavaScript will check which option the user selected. If Camping Equipment is selected a pop up alert will tell the user which years of data will be included in report.
Steps:
- Open the previous saved sample report “mylist” in Report Studio.
- Go to Prompt Pages -> Prompt Page 1
- Double click on HTML Item and update the JavaScript to following:<script LANGUAGE=”JavaScript”><!–//call cognos built-in function to get the formvar fw = getFormWarpRequest();// reach the dropdown listvar dropdown=fw._oLstChoicesmydropdown;//clear the class attribute of the dropdown listdropdown.className=”;dropdown.style.backgroundColor=”#CEECF5″; //set back ground colordropdown.onchange=check; //onchange event call check functionfunction check( ){var idx=dropdown.options.selectedIndex; //check which option is selectedif ( dropdown.options[idx].value==”991″ ) //if camping equipment option is selectedalert (“Camping Data only includes Year 2009 to Current data”) ;}//–></script>
- Save the report.
- Run it from Report Studio. You will notice that the background color of the drop down box is set to light blue, and a message will be popped up only when Camping Equipment selection is selected:

8 – Editing a IBM Cognos Report Data Element
Report data elements such as lists, crosstabs, and charts are different elements on a report page (a web page). Usually they are not tied to a web form as they are results based on user requests. That being said, it may require additional user interface items to be added to the report so that user requests can be processed. In the next demo we will use JavaScript to dynamically show or hide list object data based on a user selection. Custom buttons are added to facilitate the show/hide requests.
Steps:
- Open previous saved sample report “mylist” in Report Studio.
- Go to Report Pages -> Report Page 1.
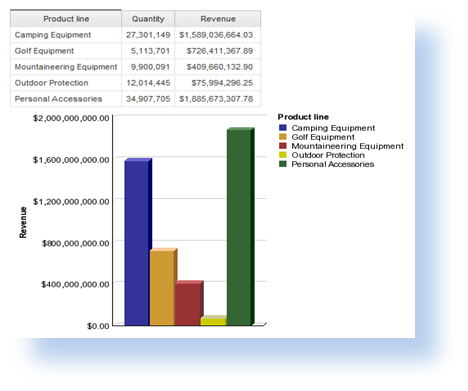
- Drag a chart object from the Insertable Objects pane.
- Set the chart to use the same data query that the list uses.
- Drag the Revenue data item as Default Measure of the chart.
- Drag Product line data item into the Series area.
- Save and run the report. You should have both the list and chart shown on the report.
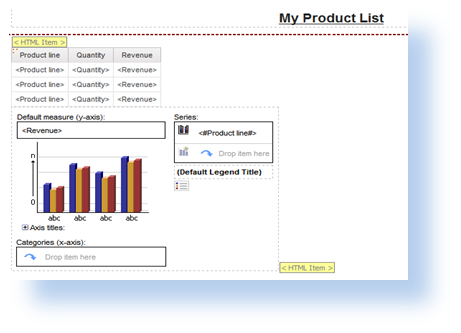
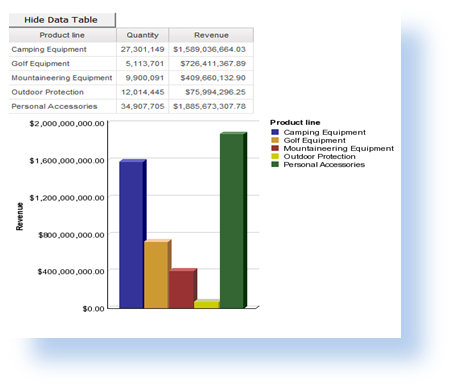
- Drag a new HTML Item before the list table, and type in the following :
<input type=”button” value=”Show Data Table” onclick=”showhide()” id=”showbutton” style=”display: “>
<input type=”button” value=”Hide Data Table” onclick=”showhide()” id=”hidebutton” style=”display: none”>
- Double click on the other HTML Item added in the previous step and update the JavaScript to the following:<script language=”JavaScript” type=”text/javascript”>//<!–var showbt=document.getElementById(“showbutton”); // get show button elementvar hidebt=document.getElementById(“hidebutton”); //get hide button elementvar tbls = document.getElementsByTagName(“TABLE”) // get all the tables on the pagevar mylist;var tblCnt = tbls.length; // determine the number of tablesfor(var t=0; t<tblCnt; t++){ // check each tablevar tbl = tbls.item(t); // define the current tableif (tbl.className == “ls”) // this is the list table{mylist=tbls[t];mylist.style.display=”none”; //set it to be hidden}}//dynamically show or hide list table, chartfunction showhide(){if ( mylist.style.display==”none”) //if list is currently hidden{mylist.style.display=”"; //set list to be shownshowbt.style.display=”none”; // hide “Show” buttonhidebt.style.display=”"; //show “Hide” button}Else //else if list is currently shown{mylist.style.display=”none”; //set list to be hiddenshowbt.style.display=”"; // make “Show” button displayedhidebt.style.display=”none”; // make “Hide” button to be hidden}}//–></script>
Your report should resemble the image below:
- Save and run the report again. By default the list data table is hidden.
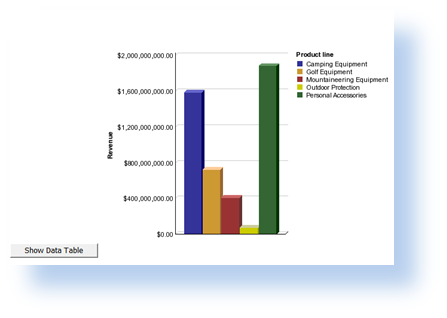
- Click on the Show Data Table button, the list table will immediately be displayed. One of the benefits of using JavaScript here is that the report doesn’t have to re-run to dynamically perform the show or hide object action. Both list and chart are generated at report initial run. JavaScript simply shows or hides the list and chart at runtime.
Summary
Congratulations! Over the past few hours you have learned some fundamental JavaScript coding practices in Report Studio. As you can see, it is not nearly as difficult as you may have feared. The business value of using JavaScript can plainly be seen in the above samples and is really limited to the user’s imagination. With a few lines of JavaScript code in Report Studio, you can enhance the report’s user interface, usability, performance, dynamic interaction capabilities and many other options.
While JavaScript is an extremely useful tool, it is not recommended that IBM Cognos developers use JavaScript too heavily. We recommend that you think carefully before you actually start to develop and embed JavaScript in your reports. The primary concern is around the maintenance, upgrade and future sustainability. IBM Cognos web page structures and APIs have been known to change over the course of product releases, and you may have to upgrade JavaScript code after Cognos upgrades. For advice and best practices please feel free to contact us.
Categories:
Cognos Javascript
,
COGNOS REPORT STUDIO
,
Cognos scenorios
